We received an EZ Clone 60 from Santa this year so I put it into immediate service with some cuttings from our huge Cherry Tomato plant and our healthiest Roma, Pepper, Basil, and Spinach plants. I used Olivia's Cloning Gel and Solution to get the cuttings off to a great start.
We will start using the AeroFlo36 exclusively as our starter system for our large plants while dedicating it to lettuces and herbs. The PowerGrower and Ebb n Gro systems have proven themselves with Hydroton as a growing medium. We have 2 empty modules on each, waiting for the cucumber and white eggplants to be transferred from the AeroFlo36 once matured.
Grow 5 seedlings are doing very well. Nothing exciting in this grow, just more romaine lettuce to keep the family fed.
Tuesday, December 28, 2010
Santa Brought Me a Cloning Machine
I must have been a good dude at least part of the time as Santa brought me an EZ Clone 60 unit for the grow room. I set it up the other day and started the first test-batch of cuttings. We used Olivia's Cloning Gel on the cuttings and Olivia's Cloning Solution in the tank.
We took some Cherry, Roma, Basil and Spinach cuttings to try out the unit. I was a bit concerned that I would go back in the grow room the next day and the two leaves on each cutting would be drooping, wilted, dried up or just plain dead. Nope, still look healthy after three days now.
We took some Cherry, Roma, Basil and Spinach cuttings to try out the unit. I was a bit concerned that I would go back in the grow room the next day and the two leaves on each cutting would be drooping, wilted, dried up or just plain dead. Nope, still look healthy after three days now.
Cherry Toms Harvested
Talk about sweet and abundant. We picked about 50-60 of these beautiful red wonders this past week and boy were they sweet and delicious. We are still loaded with them in various stages of ripening and will shoot some vids for y'all.
Thursday, December 16, 2010
Grow Room Update - Grow 4 Transplanted
Finally...red cherry tomatoes. Can't wait to taste these beautiful little wonders. What a busy few weeks. After a good cleaning and water changes on all the systems, it was time to have a little feast. We made a lot of pesto from the large basil plant, whipped up a very nice fennel recipe to accompany a dinner, and are already looking forward to the next culinary extravaganza from our garden.
We have transplanted all Grow 4 plants with the exception of the leeks and spinach. Grow 5 will be mostly lettuces since we seem to be eating a lot of salads now. I am reserving space in the PowerGrower as well as the Ebb and Gro systems for the upcoming Cucumbers and White Eggplant that was seeded in Grow 4.
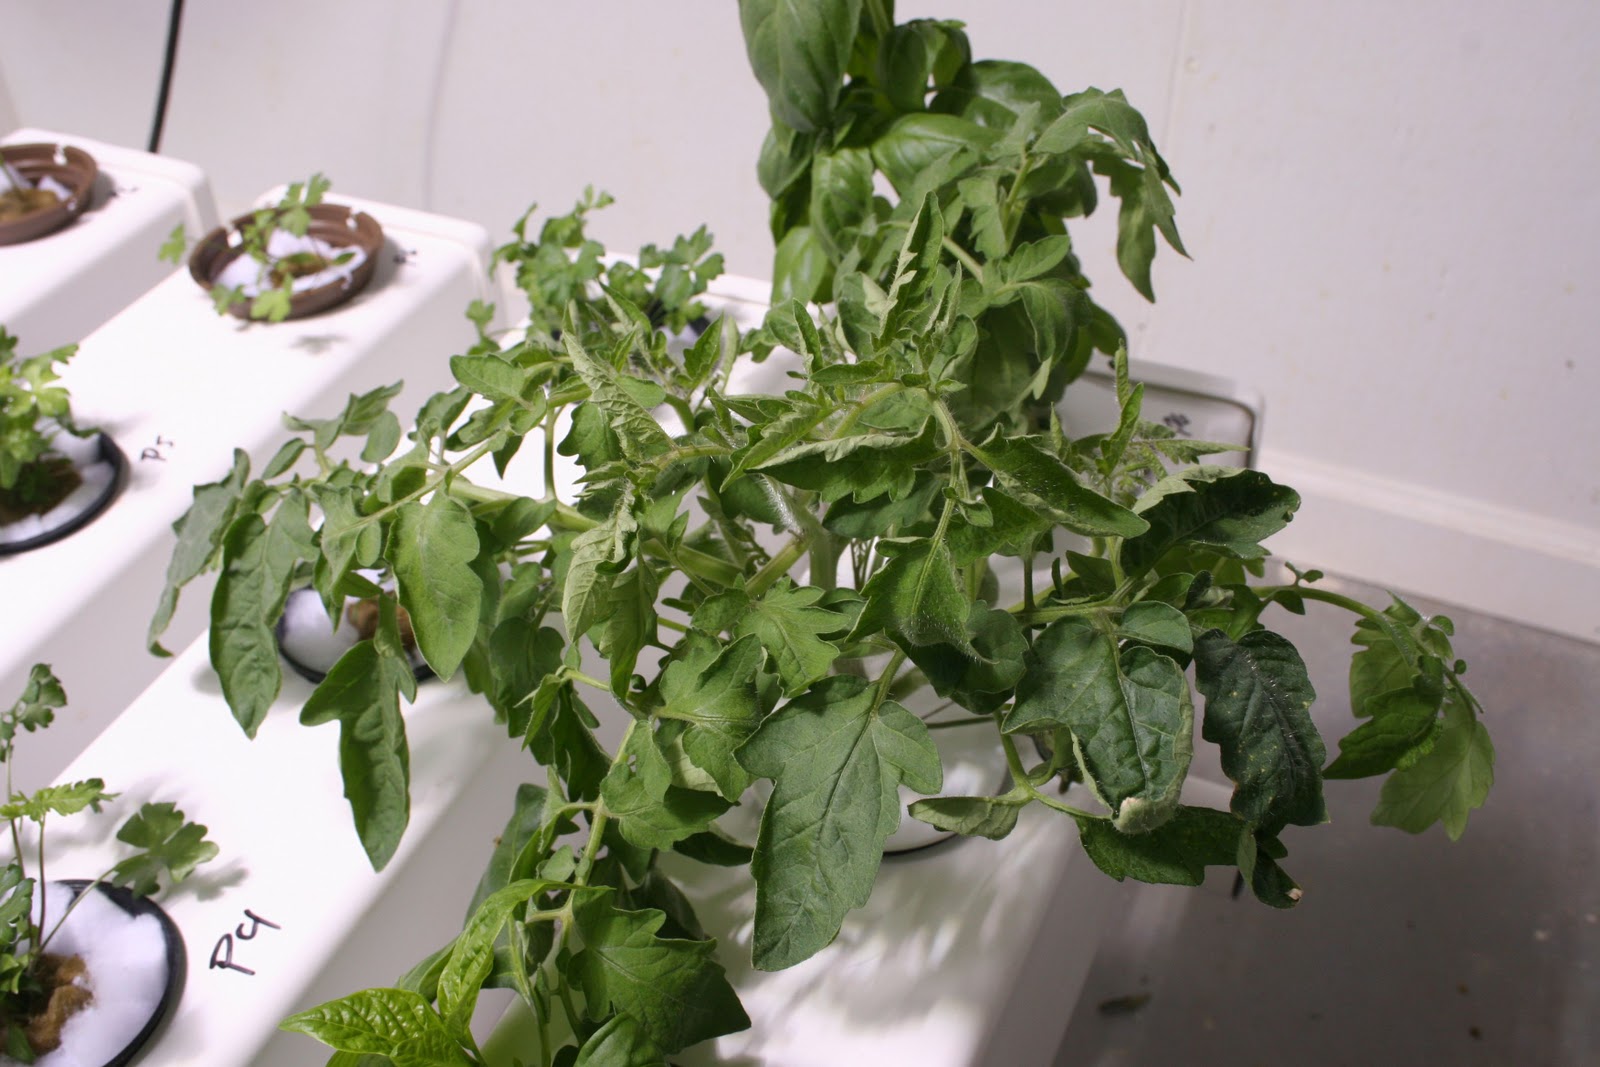
The peppers are all doing very well - even the one with a SuperNova "tattoo". Loads of flowers that soon will become nice little peppers. Our sickly Roma plant in the PowerGrower just won't give up and has several tomatoes (green) growing and getting larger. The new Roma plants look better than ever. I think our strategy of leaving them in the AeroFlo36 longer has really worked.
We have transplanted all Grow 4 plants with the exception of the leeks and spinach. Grow 5 will be mostly lettuces since we seem to be eating a lot of salads now. I am reserving space in the PowerGrower as well as the Ebb and Gro systems for the upcoming Cucumbers and White Eggplant that was seeded in Grow 4.
The peppers are all doing very well - even the one with a SuperNova "tattoo". Loads of flowers that soon will become nice little peppers. Our sickly Roma plant in the PowerGrower just won't give up and has several tomatoes (green) growing and getting larger. The new Roma plants look better than ever. I think our strategy of leaving them in the AeroFlo36 longer has really worked.
Hydroton Test Results
Those of you that have experience know that it is dirty and has to be rinsed before use. Yes, it takes time. We all want to save time, but as we found out, some time is just well spent. STG has some great products and we love their hail product for our AeroFlo36 system. For the PowerGrower and Ebb and Gro systems, Hydroton rocks! (no pun intended).
The test we conducted on the STG inserts for the Ebb and Gro system proved that Hydroton (the suggested medium for the system) was the better medium. Plants in the STG inserts didn't grow as fast or as strongly as the ones in the Hydroton.
We will be using Hydroton in the Ebb and Gro and PowerGrower for all future transplants.
Grow Room Work Day
We had a little work day in the grow room last weekend. We harvested all of the fennel and basil from the PowerGrower. Made some great pesto and a fennel au gratin that was out of this world. Thanks Epicurious.com ! Great recipe site for those inclined to exercise their culinary skills.
Cleaning and grow room work included: Complete wash down of the PowerGrower water tank and three PowerGrower Modules and AeroFlo36 rails; disposal of old STG growing medium; trimming all excess veg from the cherry tomato plants (a weekly process); transplanting Roma Tomatoes from the AeroFlow36 to the Ebb and Gro system - update in video to follow; water changes on all grow systems (glad I have the primary and secondary water barrels) with nutrient changes; Hydroton preparation for new basil plant transplants; transplanting Grow 4 seedlings to the AeroFlo36; Grow 5 Rockwool cube prep.
Seems like a lot of work, but it only took about 4 hours. Not bad. The design of the grow room and the water barrel strategy really helped. Remember that the R.O. system filters water into a "primary" 55 gallon barrel. From there, I transfer water to a "secondary" barrel where I adjust pH and mix nutrients to the correct ppm. From the secondary, I pump the solution to the grow system. While I work with the "secondary" water, the primary fills back up with R.O. water through the Merlin R.O. system. With this many systems, having a continuous output R.O. system is a must.
LED Survives Fall
Hats off to the SuperNova LED folks, the light survived a crash after the hook holding it to the suspended ceiling grid decided to break. Lesson learned - not all hooks that look alike are created equal. Certainly if this had been one of our HID lights, well, lets just say broken glass and dead plants would have been the outcome. Only one pepper plant suffered a few leaf burns were the SuperNova had been sitting on it for a few hours - yes the light stayed on even after the fall. Pepper plant is alive and well, only minor tattoos from its experience.
Wednesday, November 24, 2010
WE HAVE CHERRY TOMATOES !
The day has finally come, we now have cherry tomatoes, and even a few Roma's, popping out all over the place. We noticed the first starts early this week and new ones coming out every day. We did a nutrient change yesterday in the PowerGrower where the cherry tomatoes are growing. Significant difference - higher concentration of Canna Boost and addition of Canna PK 13/14. This nutrient shift is required, per Canna instructions, when first fruits start to bloom. We were low on water in the PowerGrower so the timing was perfect.
The Ebb and Gro system has performed very well since installation. The Grow 3 seedlings we transplanted from the AeroFlo36 (they had been in there only a few days) are keeping pace with the "like" plants from Grow 3 that stayed in the AeroFlo36. One difference noted was in the Basil. The AeroFlo36 seedling growth is beating the Ebb and Gro seedling hands down.
We took lumen measurements under the SuperNova LED this week. We noticed a significant difference in lumen (from the same distance) between the HID HPS and MH lights compared to the LED. Given the LED is only 270 watts, per the manufacturer it is supposed to put off as much light as a 1000 watt HID. Not in lumen - that is for sure. Not sure what the manufacturer means by their statements but clearly the lumen readings are significantly different. Regardless, the plants under the SuperNova are doing well, either because of a more beneficial light spectrum (more "usable" light) or some other magic we don't know of yet.
Grow 4 Planted
We finally got to plant a few new seeds this week. Grow 4 consists of:
1 Fennel (the others from previous Grows are doing very well)
2 Red Shard (new plant)
2 Spinach (new seed pack)
2 Cucumber (new plant)
2 White Eggplant (new plant)
2 Mint (new plant)
2 Leek
2 Romaine Lettuce
We will continue to update you as we progress. Most of these seeds germinate in the 10-14 day range. Hopefully we will have some room to put these plants by the time they grow out of the AeroFlo36. Interestingly, this unit has become our defacto standard for post germination planting. Although the lettuces stay until maturity, the size of our other plants have necessitated transplanting out of this "nursery" system.
Thursday, November 18, 2010
Grow 4 Planning
Now that we have Grow 3 coming to an end, harvesting lettuces, basil, and parsley (wish I could say tomatoes) from Grow 2, it is now time to start planning Grow 4.
We have chosen Rockwool cubes (based on tests in Grow 3) for all future germinations. We have decided to plant the following:
2 Cucumbers (new plant for us)
2 Red Shard (new plant for us)
2 White Eggplant (new plant for us)
1 Spinach (from a new seed packet)
2 Leeks
2 Romaine Lettuce
2 Fennel
2 Mint (new plant for us)
We trust our lettuce consumption will keep pace and that we will have a supply of basil from Grow 2 and Grow 3. As we continue to understand germination, vegetative and generative stage durations for these plants in our various systems we will hopefully have "complete" salads, vegetables, and herbs for our family needs.
LED Installed, Ebb and Gro in Production
The SuperNova LED installation was fast and simple. Wish I could say that about the cumbersome reflectors, bulbs and ballasts associated with the HID lights.

Kind of looks like an alien space ship getting ready to land. The LED has separate and controllable hue settings for blue and red light. Nice! We have the LED on the same timer as the HIDs which is controlled by the 240/120v Power Box unit.
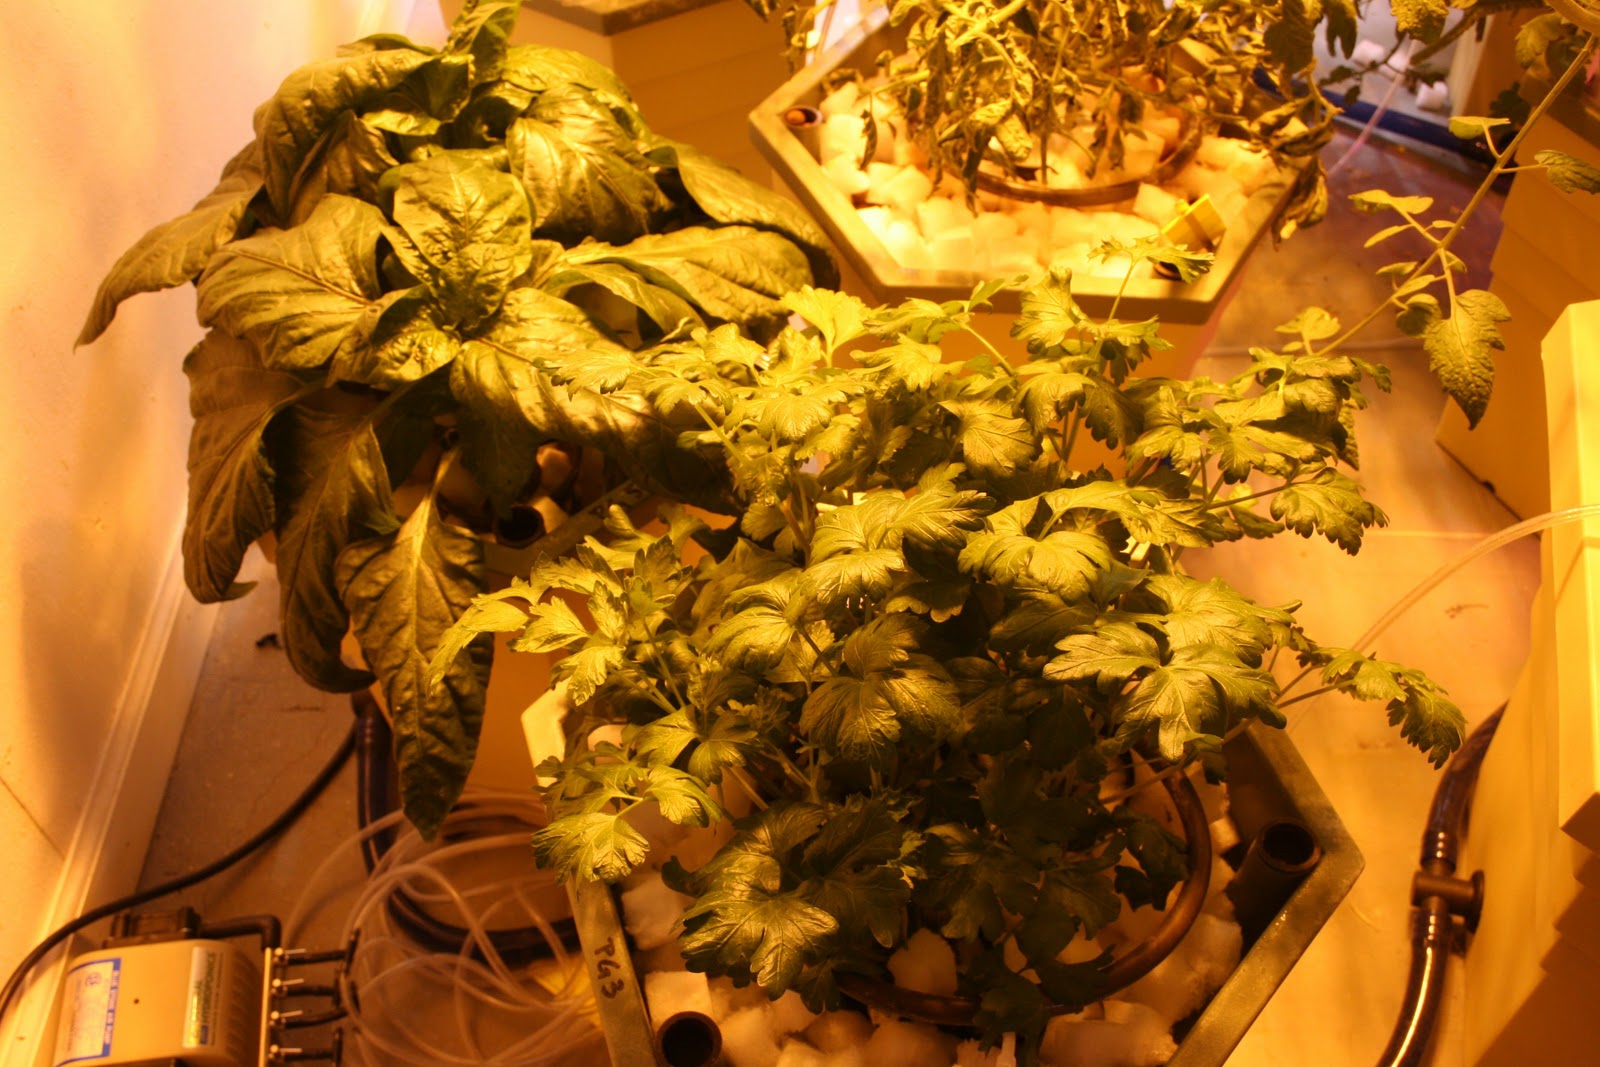
The Ebb and Gro system is now in full production. We transferred 12 plants from the AeroFlo36 today. We now have more room for Grow 4. Transfers included Romaine, Basil, Parsley, Roma Tomatoes, Yellow and Red Peppers, and even a few Leeks.

The plants transferred to the Ebb and Gro were from Grow 2 and Grow 3. We have a pretty equal split of plant species between the STG inserts and Hydroton grow media in this new system. I will admit, STG is spot on when it comes to preparation time. Take the insert and put it in the pot, versus, washing Hydroton which took about 20 minutes for 6 pots. Hint - use the top pots from the system to help rinse the dust out with the hose - the holes in the bottom make a great sieve. You can see that the LED puts off a pretty red / pinkish spectrum. Compare that to the more yellowish hue (HPS bulb) in the photos below with the Grow 2 Basil, Parsley, and Yellow Pepper plants that are in the PowerGrower.


An update on our Spinach - all hope is not lost, we now have two sprouts in the Rapid Rooter cubes and one in the Rockwool cubes from Grow 3. We are hoping to get more sprouts, but after two unsuccessful germination attempts, I will take what I have at this point.


Kind of looks like an alien space ship getting ready to land. The LED has separate and controllable hue settings for blue and red light. Nice! We have the LED on the same timer as the HIDs which is controlled by the 240/120v Power Box unit.
The Ebb and Gro system is now in full production. We transferred 12 plants from the AeroFlo36 today. We now have more room for Grow 4. Transfers included Romaine, Basil, Parsley, Roma Tomatoes, Yellow and Red Peppers, and even a few Leeks.

The plants transferred to the Ebb and Gro were from Grow 2 and Grow 3. We have a pretty equal split of plant species between the STG inserts and Hydroton grow media in this new system. I will admit, STG is spot on when it comes to preparation time. Take the insert and put it in the pot, versus, washing Hydroton which took about 20 minutes for 6 pots. Hint - use the top pots from the system to help rinse the dust out with the hose - the holes in the bottom make a great sieve. You can see that the LED puts off a pretty red / pinkish spectrum. Compare that to the more yellowish hue (HPS bulb) in the photos below with the Grow 2 Basil, Parsley, and Yellow Pepper plants that are in the PowerGrower.

An update on our Spinach - all hope is not lost, we now have two sprouts in the Rapid Rooter cubes and one in the Rockwool cubes from Grow 3. We are hoping to get more sprouts, but after two unsuccessful germination attempts, I will take what I have at this point.


LED Has Arrived
The awaited day has come. The SuperNova enhanced LED light arrived last night and we are very excited to get it installed, some plants transferred to our Ebb and Gro system and start monitoring the progress with this new set-up. We will update with some photos later.
Tuesday, November 16, 2010
Big Harvest
Took 6 lettuce plants out of the AeroFlo36 today. Salad for dinner tonight (and a few more nights too). We transplanted many of the Grow 3 plants into the AeroFlo36 today. I have to tell you that my fears of the Rapid Rooter cubes came true. Very "crumbly" medium - especially when it comes to transplanting. Rockwool and STG are no problem to transplant. I am still using STG hail in my net cups around the transplanted seedling cube.
We took a fairly equal number of Rapid Rooter and Rockwool seedlings into the AeroFlo36 from Grow 3. Only two STG seedlings were taken due to the slower growth rate, and well, we had enough for a transfer in this grow. I still have Grow 3 seedlings germinating. Two Spinach seedlings ! I am going to give them another week or so, then see if we can transplant. One is in Rockwool, one in Rapid Rooter.
I think I am going to move forward with Rockwool for seed germination on future grows due to the results and observations during Grow 3.
Monday, November 15, 2010
Grow 3, Grow Room Update, AND HARVEST !
Significant changes were made to the grow room in the last few days. We added a 30 amp circuit to provide 240 volt power to a new Power Box; we split some existing electrical circuits, added some outlets, and eliminated all but one extension cord; we changed the routing and support system for the exhaust fan which kicks on when the room is too hot (due to HID heat output); and we installed a new Ebb and Flow system from C.A.P. called Ebb and Gro.
The Basil plant has been picked several times for recipes over the weekend, not to mention the great salad we made with Buttercrunch and Arugula. Nice to finally have some rewards for all the hard work. Grow 3 continues, and it is a toss-up between Rapid Rooters and Rockwool. STG has been a dud. I think we may continue with Rockwool due to its ability to hold moisture better than Rapid Rooters even though Rapid Rooters had a faster germination rate. In the end, Rockwool caught up - and didn't dry out.
The Basil plant has been picked several times for recipes over the weekend, not to mention the great salad we made with Buttercrunch and Arugula. Nice to finally have some rewards for all the hard work. Grow 3 continues, and it is a toss-up between Rapid Rooters and Rockwool. STG has been a dud. I think we may continue with Rockwool due to its ability to hold moisture better than Rapid Rooters even though Rapid Rooters had a faster germination rate. In the end, Rockwool caught up - and didn't dry out.
Ebb and Gro has arrived
The Ebb and Gro system arrived and we were excited to get it up and running. It is an Ebb and Flow system made by C.A.P. We have 12 modules that we plan on using for our larger plants such as tomatoes, cucumbers, eggplant, peppers, etc. The Power Grower is doing great as a drip system but we wanted to expand, and try a new system at the same time - with an LED light.
Although we don't have the SuperNova LED yet, we went ahead and installed the Ebb and Gro yesterday since we had all the electrical work finished. The instructions were easy to understand, the system was easy to install, and our water test was successful - aka - no leaks !
The instructions indicate that the system was designed for Hydroton. We are going to do another experiment. Sure To Grow (STG) designed a product with their medium to work specifically with this Ebb and Gro system so we are going to try it. We really believe in the concept that STG has for their Hydroponic medium even though the seed germination product just isn't working as well as the traditional mediums of Rapid Rooters or Rockwool (at least it isn't for us).
Our strategy is to plant one STG and one Hydroton module of each plant type from the same Grow to see how each medium works in the Ebb and Gro system. More to come on this...
Grow Room Upgrades
Wow what a busy few days. With the coming addition of an Ebb and Flow system we decided to split some circuits, add some outlets, get rid of all the extension cords, and most importantly get our HID lights on 240 volts to reduce our power consumption. Both lights were on 120v circuits, drawing twice as many amps as they would at 240 volts.
We ran a new 4-wire 10 gauge cable from the circuit panel to the grow room on Friday. The cable supports a new 30 amp circuit in the panel and a Power Box system with four 240 volt circuits and two 120 volt circuits. The Power Box has a built in timer that replaces the little timers each light was plugged into before. The two 120 volt outlets on the Power Box can either be constant on, or controlled by the timer.
Power Box makes several models in 30, 50, and 60 amps. The 30 amp unit we purchased doesn't have all the features of the larger models but is the right size (with growth) for our room. One feature that would have been great on this unit would be a "delay on" for HID lights after power outages. Funny, in the new catalog that came with the box it was shipped in...."New for 2010" - a separate "delay on" box that you can attach. Didn't see that on their website, or in any of the on-line Hydroponic stores.
I can proudly say that now all the extension cords are gone and the Power Box is up and running our HID lights.
Sunday, November 7, 2010
New System Experiment
We will add an Ebb and Flow system (Ebb n Gro) to our grow room in the newly reclaimed space. We are also going to do an experiment with both Hydroton and STG Deluge which is designed specifically for the Ebb n Gro buckets. It will be interesting to see which medium does better with our plants. We have an eye on the red and yellow pepper plants currently in the AeroFlo36 as potential transplants to the new system.
As heat is becoming an issue for us (or certainly will in summer), we have also chose an LED lighting system. We selected the Super Nova Enhanced Spectrum light. It sports a nice function of custom selecting blue and red spectrum mixes to support the cycle of your plant's growth. The manufacturer also provides a three year warranty, first year 100%, second and third prorated. Look for that warranty on LED lights you are considering and be careful of the knock-offs on EBAY.
The Super Nova we selected provides light output for a 3x3 area that is supposedly greater than a 600 watt HID. It will be interesting to see if that is true. I am really excited about little to no heat output from the light and 1/8th of the amount of energy usage in the grow room.
Grow Room Changes
We finished the nutrient swap today by draining the FloraKleen solution that ran last night in the PowerGrower and then adding the Aqua Flores, Rhizotonic, Cannazyme, and Boost solution. The Metal Halide bulb was changed to High Pressure Sodium yesterday, and as you can see in the video it definitely has a different color spectrum.
The grow room went through a major reconfiguration today. We removed a large workbench to make room for our next system. A new station was set up with a narrower work surface (not as deep as the workbench) to give us a small working area as well as seed germination and cloning space.
The grow room went through a major reconfiguration today. We removed a large workbench to make room for our next system. A new station was set up with a narrower work surface (not as deep as the workbench) to give us a small working area as well as seed germination and cloning space.
Saturday, November 6, 2010
Bulb Change
The PowerGrower plants are now receiving light from a High Pressure Sodium bulb (HPS) that we swapped out with the Metal Halide bulb. Our ballasts are the electronic/digital type that can support either type of bulb.
We are using the HPS bulb now as the plants (mainly the Cherry Toms) are in the Generative stage and require more red color in their light spectrum for the best flower and fruit growth.
We are using the HPS bulb now as the plants (mainly the Cherry Toms) are in the Generative stage and require more red color in their light spectrum for the best flower and fruit growth.
Hydroton Test
The Roma that was kicked back to the AeroFlo36 (Grow 1 plant) after suffering near death due to dehydration in the PowerGrower is now in a stand-alone module. It was starting to shadow the other plants in the AeroFlo36 with its canopy so we thought it a good time to run the Hydroton test.
We used well rinsed Hyrdroton for about three quarters of the module but ran out. The net cup is sitting nicely on Hydroton with roots dispersed throughout. We "topped off" the module with some STG Hail we had on hand.
We took nutrient solution from the AeroFlo36 and filled up the module, added the air pump line. We will leave this plant on continuous drip, watch it closely, and give you some results. We have not used Hydroton as a growing medium to date.
Nutrient Changes
We drained both the AeroFlo36 and PowerGrower today. The AeroFlo36 went first, no cleaning as it looked fine, and received a new batch of water and increased nutrient levels. We were running in the high 800s due to the small plants. Now that they have matured a bit, we increased to full strength at about 1050 ppm (vegetative state) using Canna Aqua Vega, Rhizotonic, and Cannazyme with the pH level at 5.5.
The PowerGrower was drained and now has a cleaning solution running through it and we will leave the pumps on continuous drip to help clear residual salts. Tomorrow morning we will drain all of the cleaning solution and change the nutrients to the Aqua Flores, Rhizotonic, Cannazyme and Boost mix as stated in the previous post.
We moved the Basil kickback back to the PowerGrower module with the bigger Basil plant. The root structure looked better and we made sure a the drip ring was right over the root ball.
Friday, November 5, 2010
Equipment and Nutrient Change Tomorrow
Nutrients
We have seen the Generative (aka flowering) stage begin on our Cherry and Roma Tomatoes in the PowerGrower. Our nutrient solution in the PowerGrower is Canna Aqua Vega, Rhizotonic, and Cannazyme delivered at Canna's published rates. We will now switch to Canna's Aqua Flores, reduce the Rhizotonic concentration, keep the Cannazyme about the same, and add Boost. All of these products are available in different size containers (1 liter, 5 liter, etc). We will continue to follow dosing rates per Canna's literature.
Lesson learned - if you have two big systems like I do, and run successive grows back to back - get the big jugs of nutrients. You will also need one of those big syringes to get the nutrient out of the big jug (unless you like funnels and big measuring cups).
I have not experimented with other nutrient manufacturers' products, nor am I endorsing any product for any type of financial gain or consideration. All I can say is that this Canna stuff works extremely well for me while following their recommended dosing and while also using their nutrient additives (like Rhizotonic, Cannazyme, Boost, etc) to the base products of Aqua Vega or Aqua Flores.
Lighting
We will change the HID light bulb above the PowerGrower from Metal Halide (MH) to High Pressure Sodium (HPS). A metal halide bulb has a high concentration of blue light spectrum and is primarily used during the Vegetative stage. A high pressure sodium bulb has a high concentration of red light spectrum and is primarily used during the Generative stage. Either bulb will provide results for you. If you want the best results, use them during the identified stages, if you can, to improve your results. The MH bulb in the HID above the AeroFlo36 will remain since those Grow 2 plants remain in the Vegetative stage.
Tomato News
The Cherry Toms have continued to sprout flowers all over each plant. Roma Toms continue to baffle me a bit. Roma in the AeroFlo36 has made a great comeback but still is slower than the Cherry was in the AeroFlo36. We are suffering from "leaf curl" with the PowerGrower Roma and I need to get the books out tonight to research a solution. Funny thing is, it actually sported its first flower yesterday.
I have continued pulling suckers off the Cherry Tom plants and now that the CO2 is back on in the room we have seen more growth than ever before. After no CO2 for a week, you can really notice the difference in the veg that was added during this week now that it is back on. Lesson learned - if you want it to grow bigger and faster, add CO2. We run 1500 ppm.
 |
| Roma in PowerGrower - notice "leaf curl" |
 |
| Cherry Toms in PowerGrower - adding flowers daily |
 |
| Roma "kickback" adding veg, no flowers, no leaf curl. Hmmm |
Grow 1 and 2 Plants Exploding
Our AeroFlo36 and PowerGrower continue prove themselves as very good investments. Not only have we seen great progress on our Grow 2 plants placed in the AeroFlo36 but also the two plants (Roma Tom and Basil) that we kicked back from the PowerGrower from Grow 1 that we thought would die. Check out the root mass now on the Grow 1 Basil that is recovering nicely:
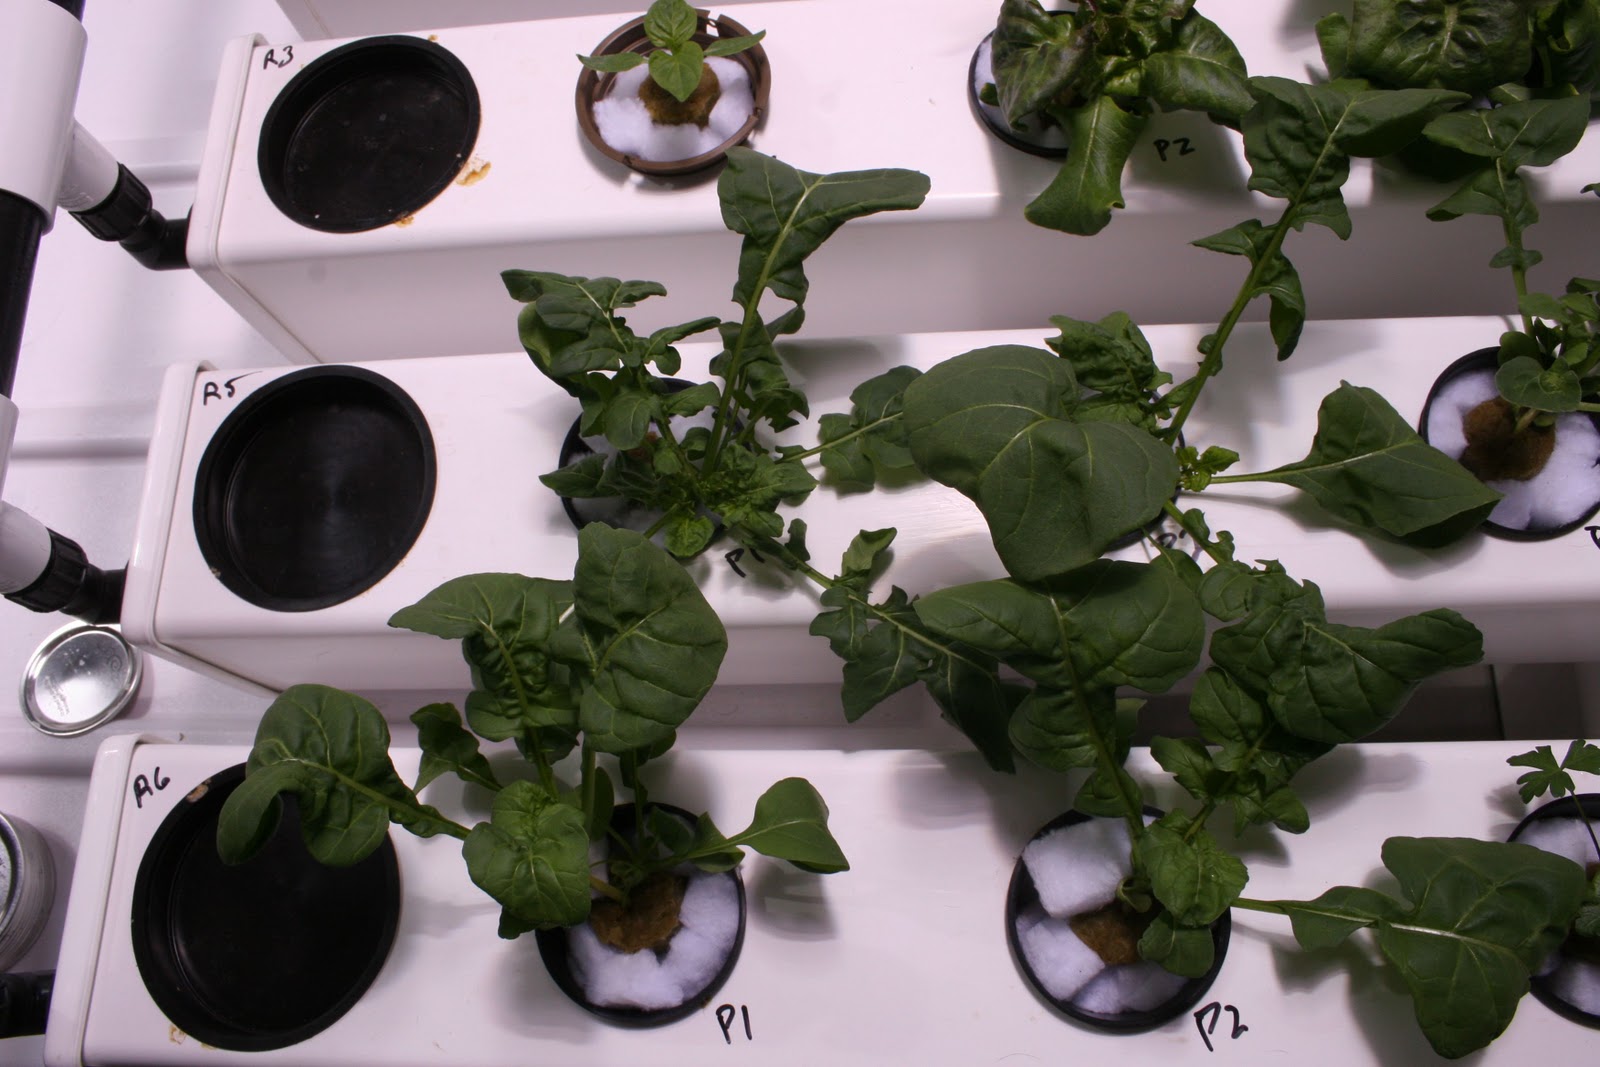
 The Arugula adds more leaves every day while the Yellow Peppers aren't far behind in veg. I must find a home for these peppers in the PowerGrower soon (or maybe an Ebb and Flow system test? Hmmm). That little Leek in P1 below next to the yellow peppers is sporting good growth too.

 The Buttercrunch lettuce seems to just love the AeroFlo36 as seedlings from Grow 2 are doing wonderfully. Our original Buttercrunch plant from Grow 1 is getting huge in the PowerGrower. It may be salad time for that one in the next week. The Buttercrunch from Grow 1 was planted as a seed on Sept. 18. Wow, seven weeks from seed to table. Try that in dirt!

 We can't leave out the Basil......so hard to get fresh Basil where I live, not to mention Italian Parsley! I "staked" the Basil plant tonight as it was getting a little top heavy. Another lesson learned. STG hail is a great medium until you start using it for tall, heavy plants. It is light and fluffy....and unless you really pack it in (and I mean really!), it seems as it has a problem supporting these plants. Haven't tried those little pebbles (Hydroton) yet as it has a lot of pre-use maintenance. Maybe another test to add in the book...(Ebb & Flow, Hyrdoton, LED???)


Grow 3 - Cube Test Results Day 4
The results are in, and it appears that the Rapid Rooters are leading the pack. They were the first to show signs of germination (Romaine Lettuce) after 3 days. The seed packet indicated a 5-10 day germination cycle on these seeds. Wow.
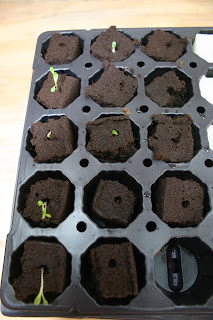
The Romaine is in the far left column. Four out of five seeds germinated so far. Second column (from left) has Basil in the top three cubes (going down) and the last two are Roma tomatoes, the far right column - my dreaded spinach.
The STG cubes are getting smoked so far with only two Romaine seeds germinating in the bottom two cubes of the first column.

We can see the beginning of other seeds germinating (as of today) but nothing confirmed as of this posting. As of now, STG is dead last in this three horse race.
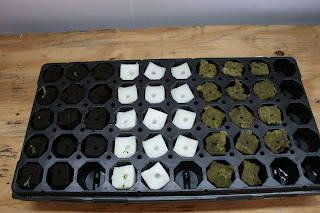
The Rockwool cubes are running in second after four days. We have progress on the Romaine as we did in the Rapid Rooters, however, the activity didn't show until late yesterday and early this morning.

As you can see, we have fewer seeds that germinated (only bottom three in first column) and no signs in any of the other Rockwool cubes. The tray with all the cubes shows the three in comparison. All seeds are planted in the same order as to number of cubes per type of plant and layout in the tray.
Grow 3 is comprised of:
Basil - 9 Plants (3 Rapid Rooter, 3 STG, 3 Rockwool)
Romaine Lettuce - 15 Plants (5 Rapid Rooter, 5 STG, 5 Rockwool)
Roma Tomatoes - 6 Plants (2 Rapid Rooter, 2 STG, 2 Rockwool)
Spinach - 12 Plants (4 Rapid Rooter, 4 STG, 4 Rockwool)

The Romaine is in the far left column. Four out of five seeds germinated so far. Second column (from left) has Basil in the top three cubes (going down) and the last two are Roma tomatoes, the far right column - my dreaded spinach.
The STG cubes are getting smoked so far with only two Romaine seeds germinating in the bottom two cubes of the first column.

We can see the beginning of other seeds germinating (as of today) but nothing confirmed as of this posting. As of now, STG is dead last in this three horse race.
The Rockwool cubes are running in second after four days. We have progress on the Romaine as we did in the Rapid Rooters, however, the activity didn't show until late yesterday and early this morning.

As you can see, we have fewer seeds that germinated (only bottom three in first column) and no signs in any of the other Rockwool cubes. The tray with all the cubes shows the three in comparison. All seeds are planted in the same order as to number of cubes per type of plant and layout in the tray.

Grow 3 is comprised of:
Basil - 9 Plants (3 Rapid Rooter, 3 STG, 3 Rockwool)
Romaine Lettuce - 15 Plants (5 Rapid Rooter, 5 STG, 5 Rockwool)
Roma Tomatoes - 6 Plants (2 Rapid Rooter, 2 STG, 2 Rockwool)
Spinach - 12 Plants (4 Rapid Rooter, 4 STG, 4 Rockwool)
Monday, November 1, 2010
Grow 3 Launch and Grow Room Update
We have planted all the seeds for Grow 3. We used 14 cubes of Rapid Rooter, STG, and Rockwool. We used the Rockwool conditioner on all three mediums for control purposes except that the Rockwool cubes were soaked overnight.
Our Cherry Tomatoes have put on an amazing amount of veg since transplanting from the AeroFlo36 to the PowerGrower. We now have our first flowers !! The Basil is getting taller and adding new leaves daily. All other Grow 2 transplants are showing great progress in the Aeroflo36. We lost three Leek plants we placed in the PowerGrower yet the ones in the Aeroflo36 are doing fine. We placed the Leek Rockwool cubes right under the dripper of the PowerGrower so either too much moisture or something else whacked the little Leeks. RIP.
The Roma Tomatoes are growing much slower than the Cherry. Not sure why. All were from the same Grow. We actually had to move one of the Roma plants back to the AeroFlo36 due to its immature root structure. Lesson learned - make sure you have significant roots to spread out in the PowerGrower module if using STG hail. It just doesn't wick and a small root circumference will lead to plant dehydration.
Grow 3 Experiment - Planting Strategy
Grow 3 will be an experiment with three cube mediums. In our first planting, Grow 1, we used Sure to Grow (STG) cubes and had pretty abysmal results. We thought our methodology may have been flawed and determined we would try STG again to be fair. In our second grow, Grow 2, we used Rockwool cubes using a Rockwool conditioning solution and a different planting/germination methodology and had very good results. We had some Rapid Rooter cubes on hand and determined an experiment with all three was warranted.
Grow 3 will use Rapid Rooter, STG, and Rockwool cubes using the same germination methodology as we employed in Grow 2. We will plant Romaine, Roma Tomatoes, Basil, and the dreaded Spinach. We have yet had spinach germinate (maybe bad seeds?). We will plant each medium with a series of the same seeds and document the results. The medium that produces the best will be the medium we use for all future Grows (until Santa Clause brings me a cloning machine).
Grow 3 will use Rapid Rooter, STG, and Rockwool cubes using the same germination methodology as we employed in Grow 2. We will plant Romaine, Roma Tomatoes, Basil, and the dreaded Spinach. We have yet had spinach germinate (maybe bad seeds?). We will plant each medium with a series of the same seeds and document the results. The medium that produces the best will be the medium we use for all future Grows (until Santa Clause brings me a cloning machine).
Where did the CO2 Go?
We went without CO2 for about a week as I needed to refill the tank I had and add a second (the welding shop that carries CO2 is about 50 miles away) since I have a dual CO2 regulator. I traded my tanks at the welding shop early last week - it is a swap program, empties for refilled tanks - and hooked up the new ones to the dual regulator on . I opened the valves on the tanks, and the regulator showed pressure so all was good....so I thought.
Coming back to the grow room an hour or so later I noticed a strange smell and immediately suspected CO2. I went to the C.A.P. CO2 ppm monitor, and well, I don't want to tell you what it read, only that it was probably deadly to humans. I closed the valves on the tanks and got out the door fast leaving the door open so the room would clear.
Upon my return I verified that the room was safe (C.A.P. ppm monitor back down to reasonable level but still high) and began to check on the tanks. I sprayed the tank connections with a solution of dish soap and water to see if there were any leaks. Bubbles started forming all over the top of one tank. Unfortunately the leak can only be detected once the gas is on, not when the valve is closed. Go figure. Lesson learned. I couldn't get back to the problem until yesterday.
I rechecked all the o-rings on the regulator and they were all fine. I ended up disconnecting the bad tank and am now running on one tank connected to the regulator. Back to the welding shop for a trade in. At least the plants are getting some CO2 again.
Sunday, October 24, 2010
Grow 2 Transplanted
We spent a few hours in the grow room yesterday installing the Nutramist machine and transplanting Grow 2 seedlings. Parsley, Buttercrunch, Romaine, Yellow Peppers, Arugula, Leeks and Fennel were all put into the AeroFlo36. Roma and Cherry Tomatoes, Basil and Grow 2 Leeks and Fennel were transplanted into the PowerGrower. We now have the second HID light activated over the PowerGrower sporting a 1,000 watt SolarMax metal halide bulb.
Nutrient concentration was increased to 1160 ppm, with a pH reduction to 5.8 for the PowerGrower plants. Previously we had these plants in the AeroFlo36 with nutrient levels around 780 ppm and pH at 6.2ish. The plants were all big enough where full strength nutrients made sense.
Our C.A.P. Hum-1 humidity controller manages the humidification level in the room. The Nutramist machine activates when the humidity drops below 40% and is deactivated when humidity levels reach 50%.
We're Fogg'n Now !
I was pretty excited to get the Nutramist Fogging machine the other night but ran into a little plumbing challenge getting it connected to my 55 gallon reservoir. A trip to the local Ace Hardware and a visit with the "helpful hardware man" and we came up with enough fittings to make it work. Connected the unit to a C.A.P. Humidity controller and we were producing fog to humidify the room. Photos and video coming later today.
Wednesday, October 20, 2010
Fogg'n Tomorrow
UPS just arrived (kind of late at night - what dedication!) with the Nutramist fog machine that I will be using to add humidity to the grow room. Going to be tough sleeping tonight anticipating having it functional tomorrow.
Grow 2 Is Going Green
And we couldn't be happier.....Even the parsley germinated in Grow 2! The buttercrunch, romaine, and arugula are now at a point where we will begin to "weed out" the small sprouts and leave one per cube for transfer into the AeroFlo36. The cherry and roma tomatoes from Grow 1 are getting bigger every day. We will transplant them into the PowerGrower when we move the Grow 2 seedlings. We are anticipating the move in another week. We want to see a few roots exiting the Rockwool cubes before we move the seedlings.
AeroFlo36 Stats: pH 6.4 ppm 802
Environment: Temp 76, Hum 31%
Still have not received the Nutramist Fogger!
AeroFlo36 Stats: pH 6.4 ppm 802
Environment: Temp 76, Hum 31%
Still have not received the Nutramist Fogger!
Sunday, October 17, 2010
Grow 2 Seed Germination
Grow 2 continues to show fantastic progress. The seeds in this grow, from the same seed packages used in Grow 1, were placed in Rockwool plugs soaked overnight in Europonic Rockwool Conditioner. We planted red and yellow sweet peppers, spinach, buttercrunch, romaine, arugula, parsley, leeks and fennel.
 A significant difference between Grow 1 and Grow 2 included the use of the "plug tray". We believe that this tray allows more airflow around the seed plug, as well as within the tray (notice holes between the tray plug rows). We have not added any water to the tray since inserting the seeds into the Rockwool plugs. We have not seen any mold, fungus, or algae growth on these plugs as we did with the 98 STG cubes used in Grow 1 that were placed (packed) into germination tray. Grow 2 seeds were planted about 7 days ago. Humidity dome was removed for photos. The plug tray sits on top of a standard flat with approximately 3/4 inch of water in the bottom of the flat. The plugs in this tray do not touch the water in the flat. The water is in the flat is there to help keep moisture / humidity under the dome.
 Above you can see a close up of our first yellow pepper plant germinating from Grow 2. Other pepper seeds have started to form primary growth. Seed packet indicated normal germination rate of 10 to 25 days. We have seen germination after 7 days. Exciting!
 Our fennel grew about a half an inch between yesterday afternoon and this morning. We are now seeing the first leaves from the seed appear. These leaves were not seen yesterday. An overnight wonder! The leek seeds in the row directly to the left of the fennel (far right) are also showing progress and we anticipate we will see their first leaves in another day.
Grow 2 was germinated under "dark" conditions until we saw the first signs of leaves (buttercrunch, romaine, and arugula) and then began a 16 on / 8 off light cycle under a T5 florescent lamp. We are now planning Grow 3 and experiment with Rapid Rooter plugs, Rockwool plugs, and Sure To Grow (STG) cubes all in one modular tray.


Grow 2 was germinated under "dark" conditions until we saw the first signs of leaves (buttercrunch, romaine, and arugula) and then began a 16 on / 8 off light cycle under a T5 florescent lamp. We are now planning Grow 3 and experiment with Rapid Rooter plugs, Rockwool plugs, and Sure To Grow (STG) cubes all in one modular tray.
Grow 1 Plants in AeroFlo36


Saturday, October 16, 2010
Lumen, Nutrients, and pH Measurements
Received the light meter yesterday. Measured a little over 2500 lumen at top of plants on the Aeroflo36 and the seed germination tray. Was happy to see this as I had to guess on distance when placing the lights above the plants for this initial veg stage. I had read that 2500 was a good rate for this stage, slowly increasing to 8 to 10k lumen during flowering stage - provided that you don't torch the plants. Got to love those little light yo-yos
Running Aeroflo36 at 770 ppm of nutrients (yes, I think it should be higher, maybe around 1000 ppm - using Canna Aqua Vega, Cannazym, and Rhizotonic). I have been bringing the pH down from 6.7ish to about 5.8ish over the last 24 to 36 hours as ideal pH level, according to Canna literature, should be 5.2 to 6.2. I will continue to drop it more tomorrow to get within the ideal range. I think the air stone addition to the Aeroflo36 reservoir increased the pH a few points as it was lower when the water/nutrients were first put into the system.
Water temp holding with room temp at 75-76 degrees F
Seed germination update
Grow 2 is turning out great. We used Rockwool plugs in a plug tray, pretreated with Europonic Rockwool Conditioner. The buttecrunch, romain, and arugula all showed their first leaves after three days. At six days now, we have leeks and fennel starting to emerge.
Grow 1 plants survived the transfer to our Aeroflo36 except a few seedlings we knew weren't looking good. Roma and cherry toms are almost doubling in size each day, basil isn't far behind. Grow 1 was started in STG cubes with a 25-30% germination rate, but again, I think that was due to my performance vs STG.
Grow 3 experiment will have Rapid Rooter plugs, STG cubes, and Rockwool plugs all in same germination tray, same nutrients, and seeds to see which germination medium produces better results.
Wednesday, October 13, 2010
Hydroponic Systems and Components
Systems and Components - Logic
Several systems and components have been installed in our grow room to provide our veggies and herbs an environment in which to provide the highest yields possible. Your comments in areas where we can improve (or question our logic) are always welcome. Many of these systems are generally thought of after the enthusiastic grower has plants and figures out how to manage the expansion of their growing environment. I put in all of these systems and controls so I could focus purely on the plants in the future without having to crawl all over the room to make things fit and work.
Hydroponic Systems
The grow room started with a General Hydroponics Aeroflo36, and eventually grew to include a General Hydroponics PowerGrower Water Farm to handle larger (taller, bushier, vine based) plants. The AeroFlo is a combination of aeroponic and hydroponic technologies combined. The PowerGrower is a drip based system with a master reservoir with reservoirs in each power grower module. Growco (4hydroponics.com) has complete manufacturer installation instructions for these systems in PDF format. This is one of the few web sites I found that does that - and it is great information for those that want to know more about the systems and how they are put together. Hats off to Growco ! We will add a cloning system when we get to mature plants to help increase our re-planting rates.
Lighting & Ballasts
I chose 1000 watt light bulbs due to the actual footprint of the systems they would cover with light. Each digital ballast can manage high pressure sodium (HPS) and metal halide (MH) light bulbs at watt ratings from 400-1000 watts. I used SolarMax bulbs at the recommendation of my local grow shop, Texas Hydroponics (texashydroponics.com) due to their reliability and warranty as well as for the types of plants I would be growing. They are currently using 120v / 20 amp circuits but I may be changing it to 240v / 20 amp circuits for lower power consumption. At the time I purchased these lighting systems, I did not have knowledge of the new LED lighting systems now in the market. I plan on an experiment with eggplant with a single PowerGrower module with a LED grow light (can't wait till Christmas comes).
Water Purification
We live in a rural area but have "county" water. The water out of the tap has approx 400 ppm of "stuff" in it, not to mention a slightly chlorinated taste. With a combined requirement of the hydroponic systems being about 75 gallons per nutrient water change, a "kitchen sink" R.O. system just wasn't going to do the job. In steps the Hydro Logic Merlin Garden Pro. It produces about 750 gallons a day (you need to get some barrels - check out www.globalindustrial) and the water is pre-filtered with a Hydro Logic Tall Blue de-chlorinator filter. Using the pre-filter removes the chlorine that would damage or reduce the life of the R.O. system filters.
For unattended functionality of the R.O. system, I installed two shut-off valves in the primary water barrel. The control water flow is managed by a Merlin Electronic Shut Off Kit which uses a solenoid valve, the second is a Merlin manual float valve. Water moves from a "T" connection in the main plumbing (you also can connect so a sink faucet) to the Tall Blue, then to the input side of the Merlin Garden Pro. When the water level in the primary barrel reaches its shut-off float point, the solenoid shuts the valve, and the water flow stops. If the electronic valve fails, the manual float kit cuts off the water flow (talk about belts and suspenders, but hey, better than a flood).
I installed a second barrel that I pump water into from the primary. I use the second barrel is to do final pH adjustments and mix nutrients solutions for the plants in the two systems. After I begin pumping the water into the second barrel, the float in the primary barrel drops, allowing more water to be processed through the R.O. system into the primary barrel. After pH and nutrients are mixed into the second barrel of water, I pump it into the AeroFlo36 and PowerGrower separately using a small utility pump. I use about 35 gallons to fill the AeroFlo36 and about the same for the PowerGrower. It is much easier to mix, then pump it into the systems vs pumping R.O. water and mixing nutrients in the grow systems.
CO2 / Temperature / Humidity Controllers
I had a small CO2 tank on hand so I chose to use it and a C.A.P. dual tank CO2 Regulator/Emitter. The C.A.P. CO2 PPM monitor controls the release of CO2 based on my set points entered into the PPM monitor. The CO2 is activated (on/off) by the CO2 side of the C.A.P. CO2-4e controller. The 4-e automatically turns off all exhaust fans/AC (our HVAC is controlled separately so we use the outlet for an additional circulation fan) to the room while CO2 is discharged. The exhaust systems are managed via temperature and humidity set points on the 4-e as well. When the exhaust systems activates due to high temperature (caused by lighting systems mainly) in the room, it deactivates any CO2 discharge that was taking place and delivers power to the in-line Cap Fan. Humidity control is managed by activating a plug for a DEHUMIDIFIER. I don't have an issue with to much humidity as it is managed through the HVAC system previously installed in the room (Daiken spit system). My issue is maintaining enough humidity. Enter the Nutramist fog machine and C.A.P. HUM-1 humidity controller. Will post more when they arrive this week and are installed.
All of this technology is a bit costly, but worthwhile for the person that has to work for a living and can't spend 3 hours a day in the grow room. Besides, our mission was to provide the best possible environment to produce the highest possible yields.
Since we moved the seedlings to the AeroFlo36 and activated the CO2, we are seeing almost 50% increase in growth every day on our seedlings. WOW !
Nutrients
Talk about a confusing selection of seemingly great products. We totally punted the decision on this one to the experts at the grow shop and selected the full Canna line of nutrients. So far we don't have much practical experience with these products but we are seeing fantastic results in the plants transferred to the AeroFlo36. More updates on this as we progress through the veg stage and into flowering.
pH / EC / TDS Monitoring
I selected the "all-in-one" Hana pH/EC/TDS (HI3M) meter as it was durable, extremely accurate, and did all tests with a single device. So far it has worked fabulously.
Grow Room & Seed Germination Update
Grow Room Update
Equipment shown in the video was acquired from a local grow shop - great educational resource, and retailers with an Internet presence. Special thanks to Texas Hydroponics (www.texashydroponics.com), Growco (www.4hydroponics.com) out of Michigan, and Discount Hydroponics (http://discounthydroponics.com/) out of California for all the great service, selection, and information provided to make our grow room the best we could. Other miscellaneous items acquired locally or had on hand. I am sure that some would go the DIY approach on some of these systems, I wanted to take the "proven" systems and used them first, then experiment with self constructed systems. You sure can learn a lot from the pros, and they deserve to be paid for all those years of R&D.
We finished the grow room ducting yesterday and as you can see in the video we are now in production.
First Seed Germination
Our first germination started several weeks ago and produced less than expected results. We used STG seed cubes and got about 25-30% of the seeds to germinate. I think we know where we went wrong. The process we used included:
1. Wet all cubes in the slab with pH corrected R.O. water, no nutrients
2. Drained excess water from the propagation tray (did not "squeeze" the cubes)
3. Placed seeds in cubes at depth indicated on seed packet
4. Placed humidity dome on the tray
4. Placed propagation tray under T5 light, 16 hours on, 8 hours off
Although we had good rates on the Cherry and Roma tomato plants, the rest didn't come out well. We started to see fungus / algae / mold on top of the cubes. I think due to the high humidity under the dome and poor air circulation in the tray itself (we used the entire block of 98 cubes in the package). After a few weeks, we picked the best 12 seedlings and placed them in the AeroFlow36 system under lights on 16 on / 8 off cycle. We also cranked on the CO2 system to deliver 1500 ppm in the room.
Second Seed Germination
After assuming we had to much humidity, no airflow, and perhaps too much water in the propagation tray, we switched strategies for the second planting. We selected the Rockwool plugs in a 50 count divided tray. After soaking the Rockwool plugs over night in the conditioning solution - noted below - we placed seeds in the plugs at appropriate depths, replaced the humidity dome and left the T5 over the tray off.
After 2 days we began to see sprouts on the buttercrunch lettuce, romain lettuce, and arugula. I waited one more day (today) and saw that we had initial leaves on the same, so I turned on the T5 for 16 on / 8 off cycle. We still do not have germination on the peppers, leeks, fennel, or parsley which all have longer germination rates. Will update as we get them.
Monday, September 27, 2010
Introducing Practicing Hydroponics
First, I am not an expert in hydroponics, only a guy looking to make sense out of all the opportunities to grow healthier, more productive plants in a "non-soil" environment. My use of hydroponics started due to the frustration that many home gardeners deal with each year. Soil quality, weather, pests (airborne and four-legged ones), limited growing seasons, and in my particular case - a limited selection of locally available produce to create the cuisine my family enjoys.
As a rancher, you would think that I may have the best means of producing high quality beef and produce right out my back door. I'm not that kind of rancher. Check out www.spiralhornranch.com for more information on that side of our lives. More to the point, I have mediocre soil, hot Texas summers, literally tons of four-legged pests that love to eat anything you attempt to grow without electric or eight foot protective fences...just ask the neighbors.
My last experience gardening outdoors was almost 20 years ago using raised beds for planting. They were great and produced! Unfortunately they also required weeding, careful watering - both rain and timer based, fertilizers, and protection from pests. I became a slave to the garden.
We love to cook with fresh herbs and vegetables. Unfortunately my small rural community does not place the same demands on the local grocery stores as we do which results in a 100+ mile drive to a "big city" Central Market, Whole Foods, or more amply stocked grocery to obtain the supplies we desire. I knew there had to be a better way.
Like you are now (I suppose), I began a search on the internet and came across the subject of hydroponics. I saw an episode once on "How Its Made" - Science Channel I think - where they grew lettuce using hydroponics. Lettuce without dirt? I thought, how unnatural! That stuff must be full of chemicals and stuff that is bad for you. I wrote off the idea completely. I laugh now at my ignorance and acceptance of "traditional" ways of doing things. Come to find out, hydroponics have been used for over a century. Sorry, no history lesson here, you can Google it if you are interested about the Incas and others using the theories of hydroponics from yesteryear.
What I will show you here is what I learned and put into practice. Everything I will show you is store-bought or acquired through well known hydroponic suppliers on the Internet. Yes, I know, I could have built a lot of this stuff from local hardware super centers. All you have to do is look on YouTube for videos of DIYer hydroponic set-ups. Unfortunately a lot of them learned from their mistakes along the way. Not criticizing, I like to do a lot of tinkering too, and may still in this hobby later on. For now, I wanted proven systems (some have over 25 years of successful use) and a full basket of herbs and vegetables in a few months.
I will first document my grow room, hydroponic and aeroponic systems, water filtration, lighting, CO2 system, HVAC (Heating, Ventilation, Air Conditioning), germination station, and other grow room necessities as I saw them. I will then discuss seed selections I made and their germination. Once ready to transplant, I will show you that too. I will tell you about the nutrients I selected and how I use them. I want this blog to be interactive. As I said in the first sentence, I am not a hydroponics expert, merely a student of the subject and always willing to learn and share along the way. I will share my failures as well as my success.
Subscribe to:
Posts (Atom)